Web Push Notifications with Firebase Cloud Messaging (FCM) using Nuxt3

WHY?
Recently i was developing a project in which i had to integrate cloud messaging feature.
As usual, i visited the firebase docs, and followed the steps mentioned.
PROBLEM
Documentation has too much information written with lot of details to develop production grade projects ( but what about those who are just getting started, want to try the feature for learning, R&D, dont want to watch video).
Even though i have now 2 years of experience in software development, It was quite hard to setup basic getting started demo.
SOLUTION
- An article that is written which is simple to follow, easy for beginners to get started, Proof of concept.
Now we have the clarity about this article. we can proceed further with how.
HOW?
how to install vuefire
how to run nuxt-vuefire module
how to configure nuxt-vuefire options
Step 1: Installation & Start Firebase Client
npm install vuefire nuxt-vuefire firebase
Our application will be server rendered (SSR), you need to install firebase-admin and its peer dependencies:
npm install firebase-admin firebase-functions @firebase/app-types
pnpm or yarn instead.- Add
nuxt-vuefiremodule & provide firebase details
// nuxt.config.js
export default defineNuxtConfig(
{ modules: [
// ... other modules ,
  'nuxt-vuefire',
 ],

vuefire: {
config:
 {
apiKey: '',
authDomain: '...',
projectId: '...',
storageBucket: '...',
messagingSenderId: '...',
appId: '...',
measurementId: '...',

},
})
- Come to
App.vue
<!-- App.vue -->
<script>
import { getMessaging, getToken } from "firebase/messaging";

export default {
  setup() {
// Get Firebase app instance to use cloud messaging features.
        const app = useFirebaseApp();
        return {
            app,
        };
    },
}
</script>
Step 2: Generate TOKEN
So far, we have working app with firebase app instance to connect with cloud messaging service.
Its time to generate token (which is unique identifier for each device to send Push Notifications)
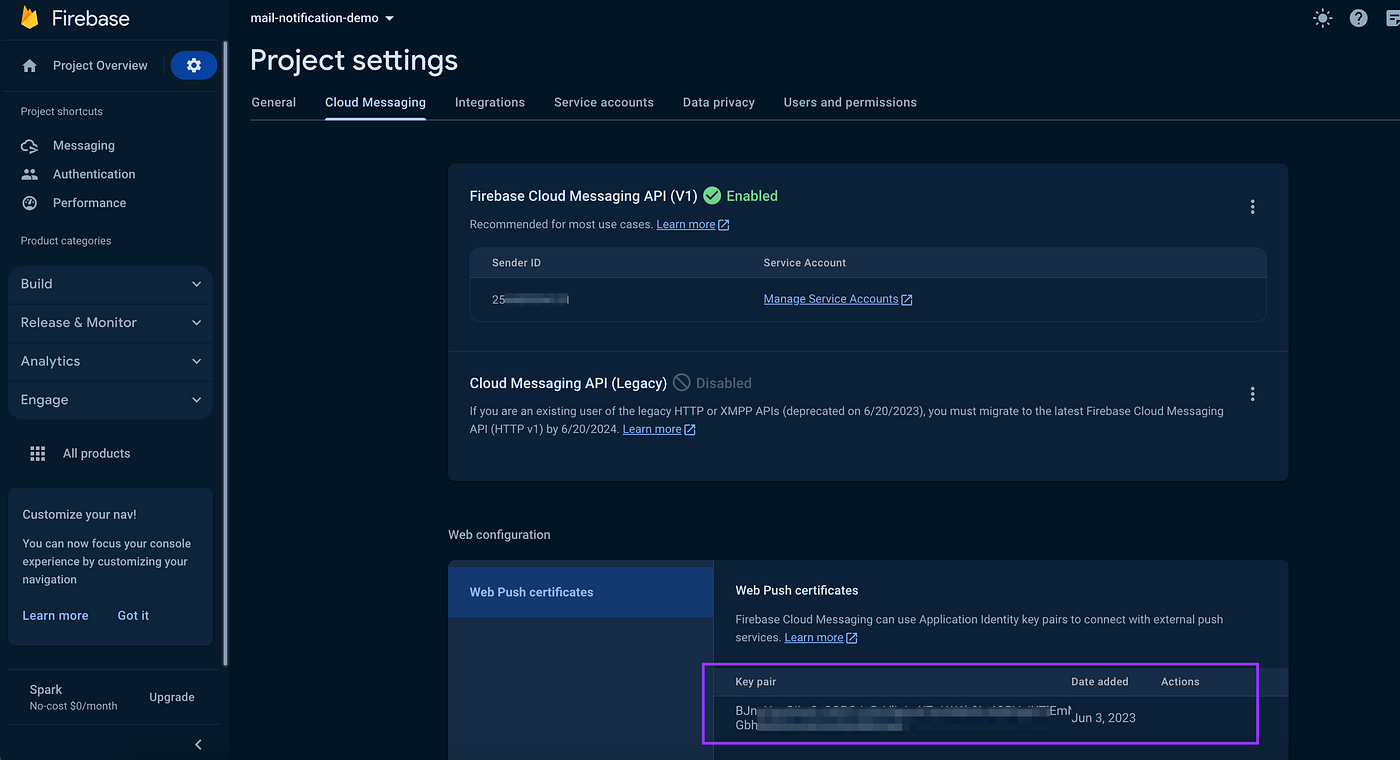
Login to firebase
Go to project settings (click on cloud messaging tab)
Enable the service
Scroll below ( you will see Web Push Certificates section )
Generate a new key pair
- Copy the key (also known as VAPID Key) to use in our code.
Back to Code
For receiving Push Notifications in background (when the app is not used or the mobile is locked) as well as when app is already being used.
Two steps are necessary
Code in
app.vue( Runs in foreground )Code in
public/firebase-messaging-sw.js(Runs in background, FYI: Its a service worker)
// App.vue
import { getMessaging, getToken } from "firebase/messaging";

const messaging = getMessaging();

// In Order to Receive token,
// we need to ask user permission via notification.
// If granted, then getToken method will return token or else throws error.
          Notification.requestPermission()
            .then((permission) => {
                console.log(
                    "🚀 ~ Notification.requestPermission ~ permission:",
                    permission
                );
                if (permission === "granted") {
                    // Add the public key generated from the console here.
getToken(messaging, {vapidKey: "BKagOny0KF_2pCJQ3m....moL0ewzQ8rZu"}).then((res) => {
                            console.log("🚀 token:", res);
                            // Send this token to server
                        })
                        .catch((error) => {
                            console.log("🚀 ~ gettoken error:", error);
                        });
                }
            })
            .catch((error) => {
                console.log(
                    "🚀 ~ Notification.requestPermission ~ error:",
                    error
                );
            });
// firebase-messaging-sw.js

// Give the service worker access to Firebase Messaging.
// Note that you can only use Firebase Messaging here. Other Firebase libraries
// are not available in the service worker.
importScripts("https://www.gstatic.com/firebasejs/8.10.1/firebase-app.js");
importScripts(
    "https://www.gstatic.com/firebasejs/8.10.1/firebase-messaging.js"
);

// Initialize the Firebase app in the service worker by passing in
// your app's Firebase config object.
// https://firebase.google.com/docs/web/setup#config-object
firebase.initializeApp({
    apiKey: "...",
    authDomain: "...",
    databaseURL: "...",
    projectId: "...",
    storageBucket: "...",
    messagingSenderId: "...",
    appId: "...",
    measurementId: "...",
});

// Retrieve an instance of Firebase Messaging so that it can handle background
// messages.
const messaging = firebase.messaging();
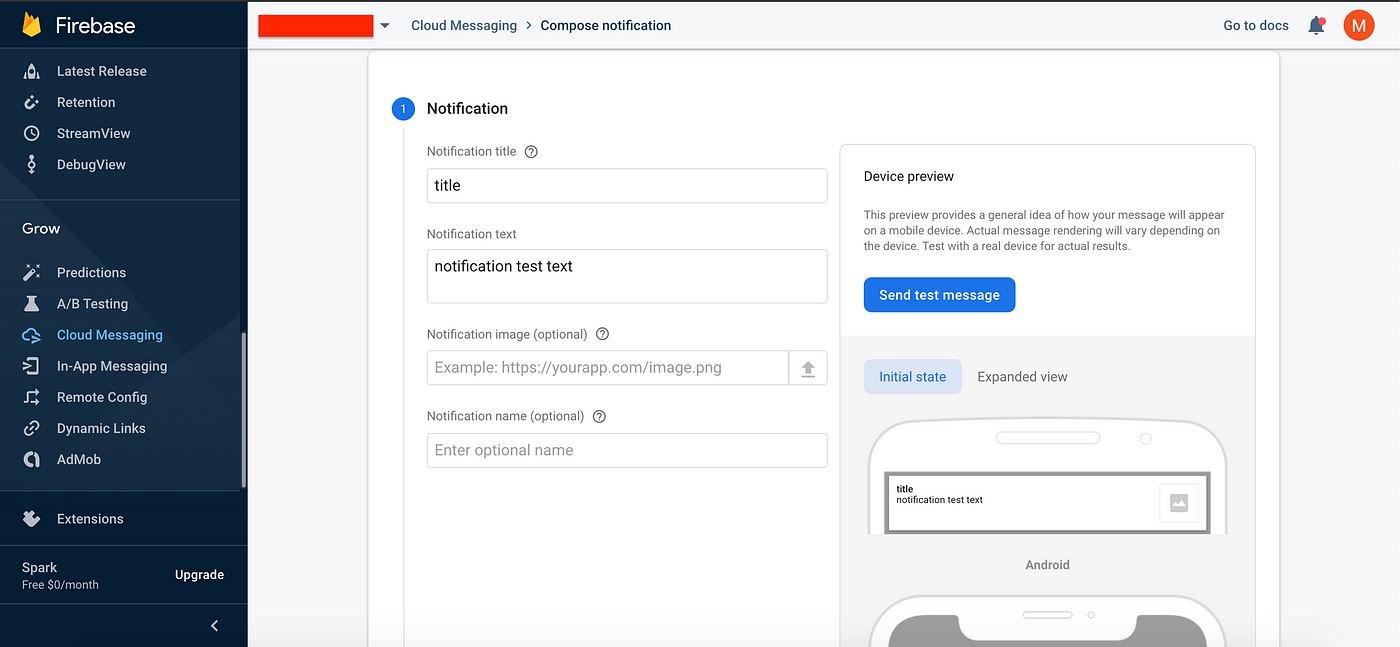
Step 3: Send Test Notification
Create new campaign
Enter all the details
After pressing Send test message, it will ask for token that we previously generated. Paste the token and send.

🎉 Task Completed 👍
Want to see Source code? 👀👇
- Package.json
// package.json
{
    "name": "nuxt-app",
    "private": true,
    "type": "module",
    "scripts": {
        "build": "nuxt build",
        "dev": "nuxt dev --tunnel",
        "generate": "nuxt generate",
        "preview": "nuxt preview",
        "postinstall": "nuxt prepare"
    },
    "dependencies": {
        "@firebase/app-types": "^0.9.1",
        "firebase": "^10.10.0",
        "firebase-admin": "^11.11.1",
        "firebase-functions": "^4.8.2",
        "nuxt": "^3.11.1",
        "nuxt-vuefire": "^1.0.2",
        "vue": "^3.4.21",
        "vue-router": "^4.3.0",
        "vuefire": "^3.1.23"
    }
}
- Environment variables
// .env
DEPLOYMENT_URL='Your deployment link'
API_KEY="Firebase API KEY"
AUTH_DOMAIN="Firebase AUTH DOMAIN"
PROJECT_ID="Firebase Project ID"
STORAGE_BUCKET="Firebase Storage Bucket"
MESSAGING_SENDER_ID="Firebase Meesing Sender ID "
APP_ID="Firebase App ID"
MEASUREMENT_ID="Firebase Measurement ID"
- Nuxt.config.js
export default defineNuxtConfig({
    devtools: { enabled: true },
    modules: ["nuxt-vuefire"],
    vuefire: {
        config: {
            apiKey: process.env.API_KEY,
            authDomain: process.env.AUTH_DOMAIN,
            projectId: process.env.PROJECT_ID,
            storageBucket: process.env.STORAGE_BUCKET,
            messagingSenderId: process.env.MESSAGING_SENDER_ID,
            appId: process.env.APP_ID,
            measurementId: process.env.MEASUREMENT_ID,
            // there could be other properties depending on the project
        },
    },
});
- firebase-messaging-sw.js
// Give the service worker access to Firebase Messaging.
// Note that you can only use Firebase Messaging here. Other Firebase libraries
// are not available in the service worker.
importScripts("https://www.gstatic.com/firebasejs/8.10.1/firebase-app.js");
importScripts(
    "https://www.gstatic.com/firebasejs/8.10.1/firebase-messaging.js"
);

// Initialize the Firebase app in the service worker by passing in
// your app's Firebase config object.
// https://firebase.google.com/docs/web/setup#config-object
firebase.initializeApp({
    apiKey: "...",
    authDomain: "...",
    databaseURL: "...",
    projectId: "...",
    storageBucket: "...",
    messagingSenderId: "...",
    appId: "...",
    measurementId: "...",
});

// Retrieve an instance of Firebase Messaging so that it can handle background
// messages.
const messaging = firebase.messaging();


